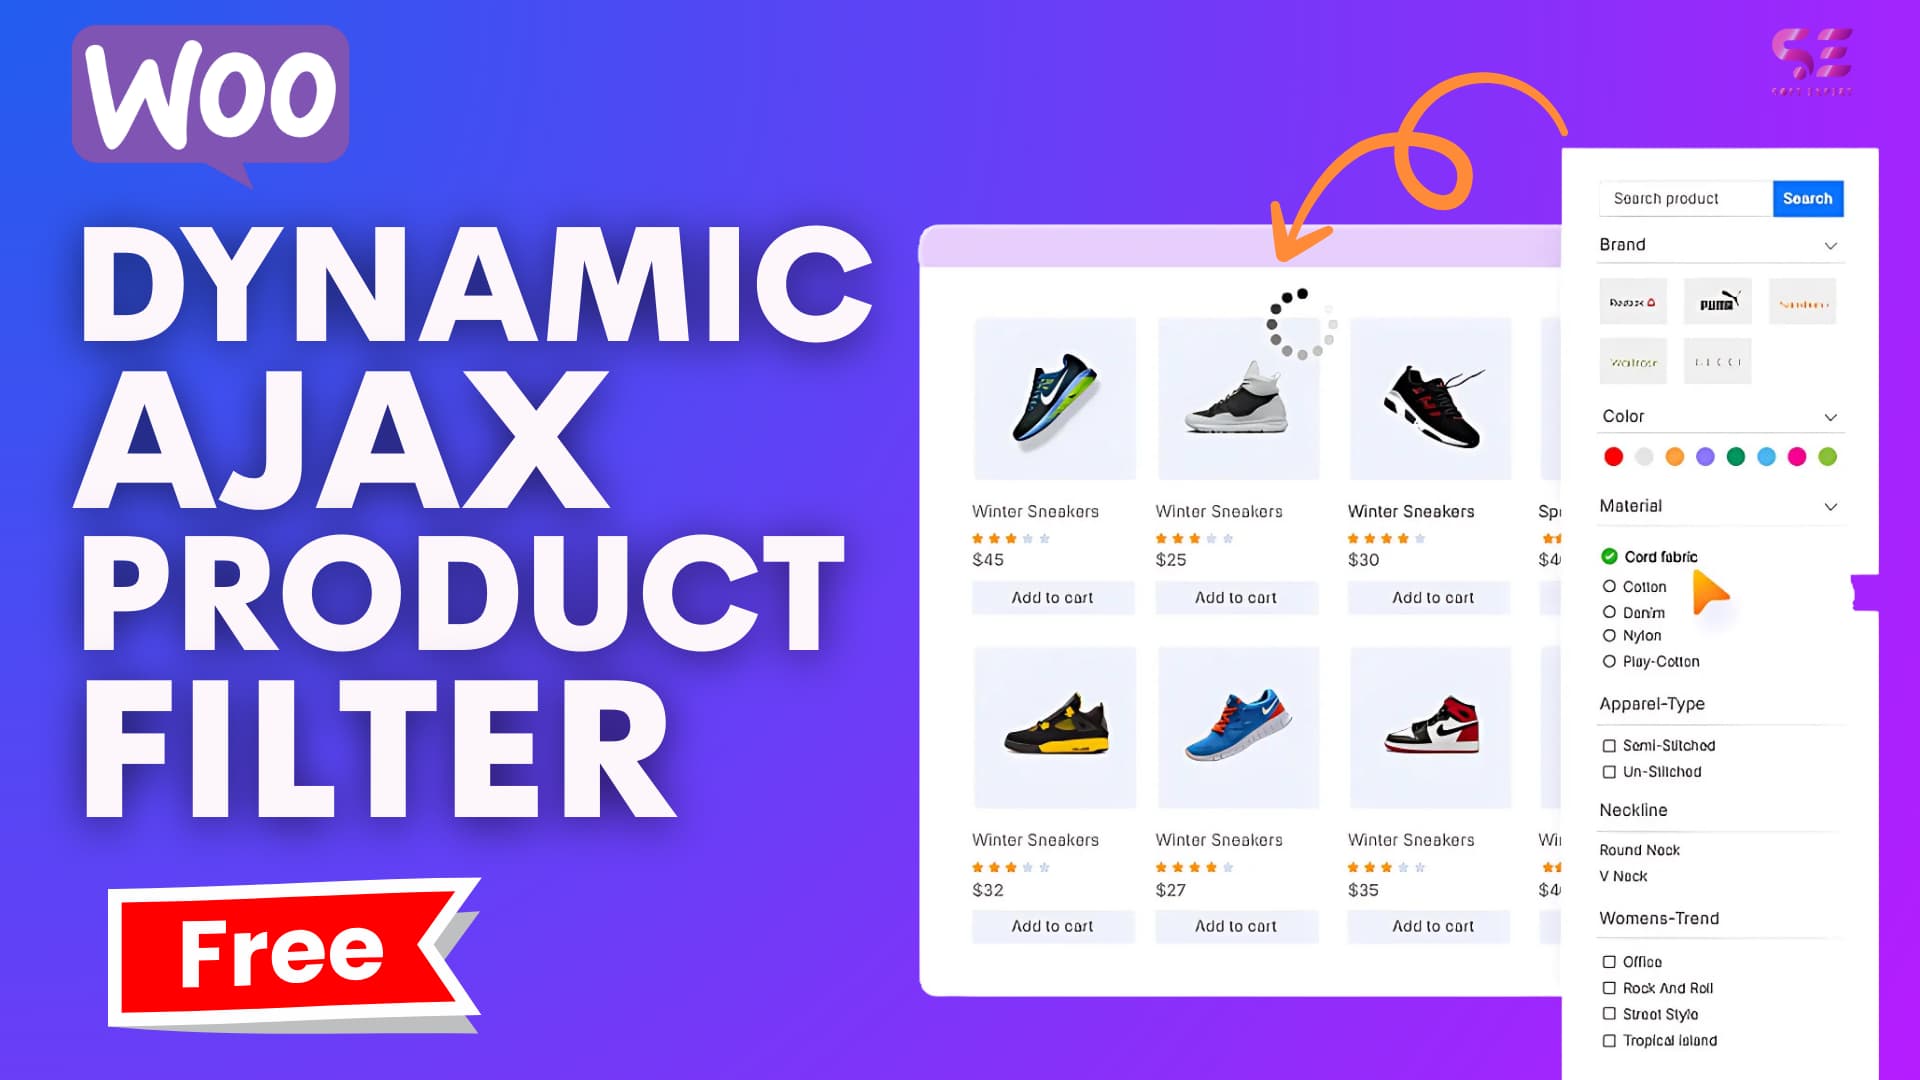
Who doesn’t want to make their WooCommerce store easier to use and faster to shop? But not every store owner can provide their customer with what they need. It’s not that they don’t have what their customers are looking for. It’s about lacking something else that can make searching and finding easier than ever. Yes, you get it right, it’s Ajax product filters in WooCommerce. So, how to set up Ajax product filters in WooCommerce?
Go to Plugins from your WordPress dashboard and click on ‘Add plugins’. Type a reliable plugin name, like Dynamic Ajax product filters for WooCommerce, in the search bar. You can also get the pro version from the website and upload it through the ‘Upload Plugin’ option. Activate the plugin, then add the Dynamic Ajax filter from the widget. Make the necessary adjustments, save the changes, and the filters will update products instantly.
If you need a detailed guide on this process, keep reading the whole article. We’re going to walk you through each step, so you can get the best experience with Ajax product filtering for your WooCommerce store.
How to Set Up Ajax Product Filters in WooCommerce? – Simple Steps
Since you already have a WooCommerce store, you’ll find it easy to set up the most essential product filters that your store needs. You do not need to be an expert developer to set up an Ajax product filter for your store. You just need to follow the simple steps we’re going to outline here.
Step 1: Install Ajax Product Filter Plugin
Go to your WordPress dashboard, click on plugins, then Add new. In the search bar, type your favorite product filter plugin, like Dynamic AJAX product filters for WooCommerce. Once you find it, click Install Now and then activate the plugin. If you want the pro version of it, just download it from the website and upload the zip file through “Upload Plugins” at the top of your plugin page.

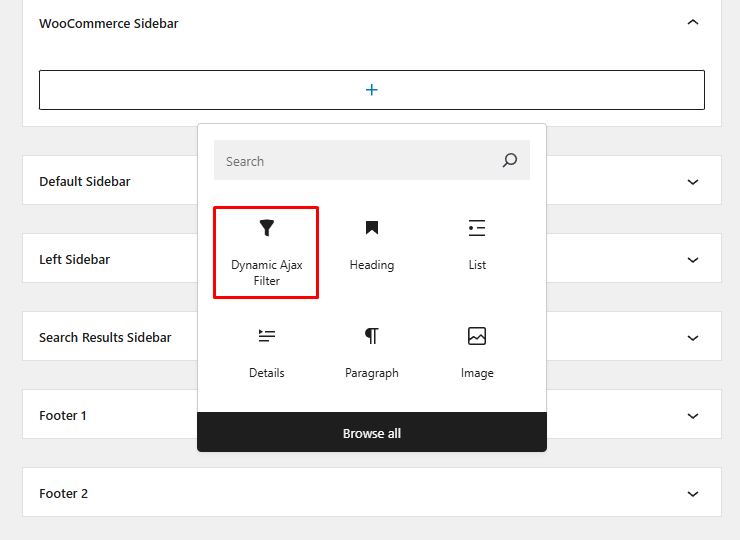
Step 2: Access the Widget
From the dashboard, go to Appearance, then go to Widgets, or page edit based on your theme. Click on the “Add block” button and find Dynamic AJAX Product Filter from the widget list. This is where you can add filter widgets through page builders like Elementor or WPbakery.
Step 3: Add the Ajax Filter Widget
After finding the Dynamic AJAX Product Filters block in the list, drag and drop it into the sidebar or any section where you want the filter to appear. You can also use Gutenberg blocks if your theme supports block-based widgets.
Step 4: Choose the Filter Type
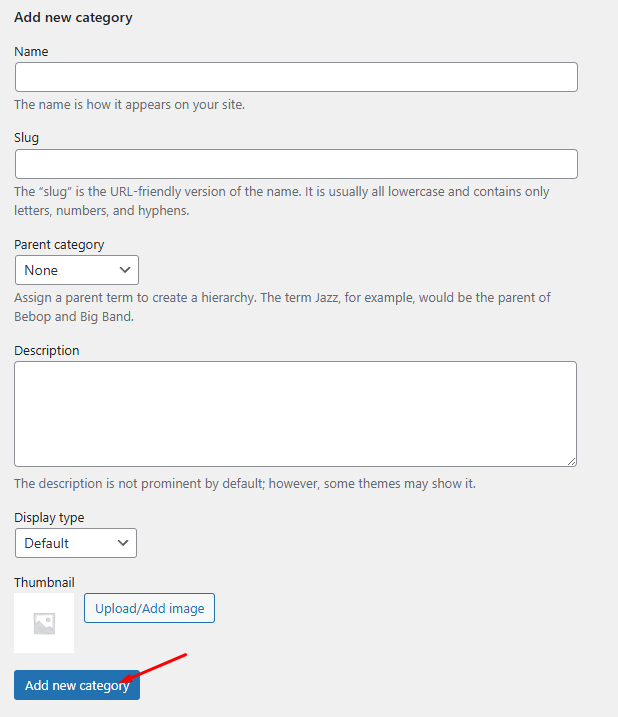
You can choose a range of filter types, such as color, size, price, tag, rating, category, brand, from “products” on your dashboard. Make sure the product has the features required by the filters you’re going to use. Suppose you want to add category filters. Then, select the Category filter from products, click on add new, fill up the field, then click add new at the bottom.
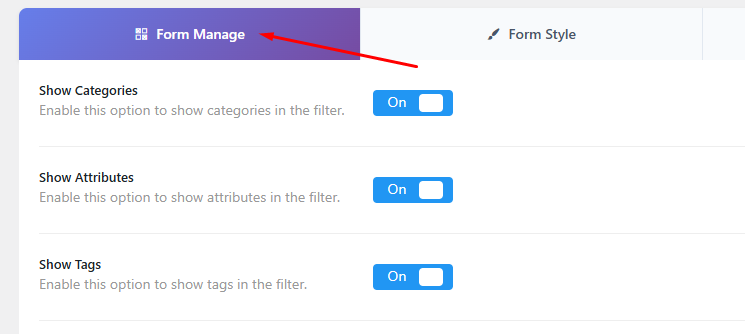
Step 5: Manage Form
Go to Product Filters, then Form Manager from your WordPress dashboard. In the settings panel, find the filter options and toggle the filter you want to display in your widget. Once you’ve toggles and turn on the filters, save the form and the filter will be activated on your store pages.
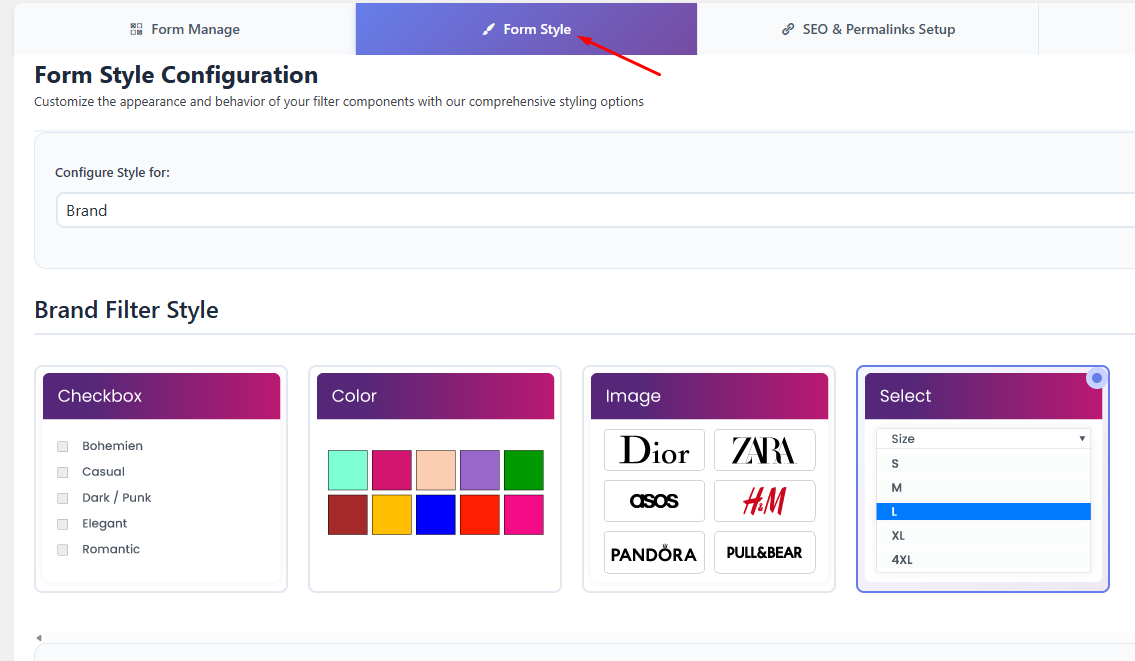
Step 6: Customize the Filter Widget
Go to Form Style from Product Filters in your WordPress dashboard. From the Select Attribute dropdown, choose your selected filter. Then, pick a style for your widget like Checkbox, Color, Image, or Select, depending on how you want users to interact with it. Adjust the suboptions accordingly and click Save to apply your changes.
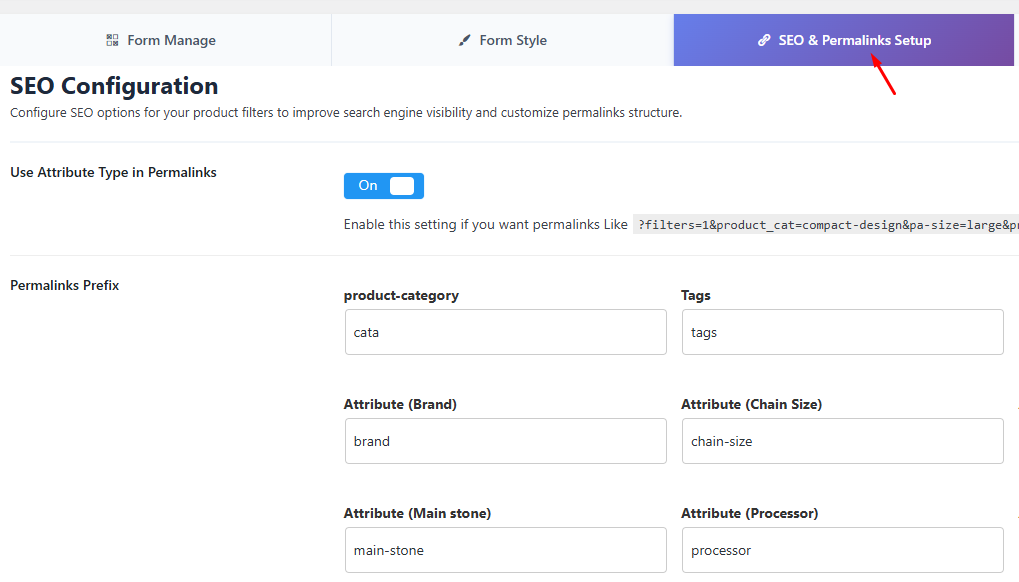
Step 7: Configure SEO and Permalinks
Click on the SEO & Permalink setup tab on the same page. Turn on the “Use Attribute Type In Permalinks” option. If you’ve selected filter methods with “Query links” or “permalinks” from the form manager, you’ll see the permalink prefix and SEO set up option here. Turn on the “Make filter link indexable for best SEO” option as well to configure metadata to make filters indexable.
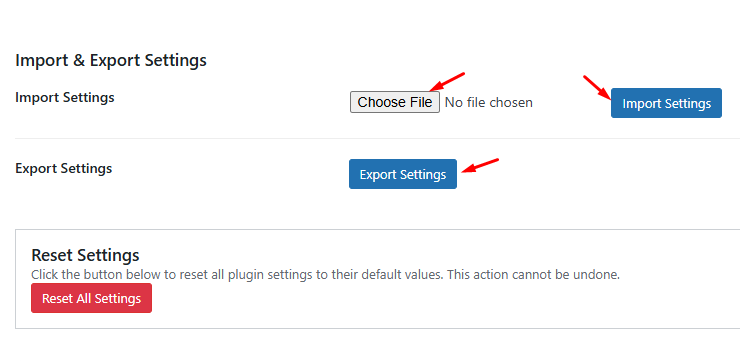
Step 8: Import & Export Settings
Once you’ve set up your filters the way you like, it’s a smart idea to export the settings as a backup or to reuse them on another site. Just go to “Advanced Settings” from the “Product Filter” menu. Click “Export Settings” to download a JSON file of your current setup. If you want to restore any saved configuration, upload your JSON file through “Choose File”, then click on the “Export Settings” option.
Step 9: Test and Use the Filter
After saving all your settings, visit your store’s front end and test the filter to ensure it works smoothly. Try filtering by different attributes to check real-time updates without reloading the page. If everything works as expected, your Ajax product filter is ready to enhance your customers’ shopping experience.
Benefits of Using Ajax Product Filter Attributes in WooCommerce
Setting up filters is not just about convenience; it directly impacts how customers interact with your store. From color and size to price and tag, each filter helps buyers find what they need faster in their own way. Here’s how different filter attributes work for you:
Category Filter
People usually do not want to spend time finding products from a store with tons of products under a lot of categories. This filter helps them to go straight to their staff without wasting time on a search. Instead of clicking through endless pages, they can jump into the right section right away.
Price Filter
Many online shoppers set a budget in their minds before purchasing from an e-commerce store. If the store doesn’t have a price filter, they might leave after seeing items outside their price range. So, a price filter keeps them feeling overwhelmed and helps you organize products based on their prices.
Size Filter
If you’re selling clothes, shoes, or anything size-related, this filter is a must. It helps customers get rid of the frustration of falling in love with a product that isn’t available in their size. By letting them filter items based on what fits, you make shopping easier, faster, and much more enjoyable.
Color Filter
Color is one of the first things people notice when shopping, especially for clothes, decor, or accessories. Such a filter lets buyers quickly find items in the shades they like without digging through every product. Whenever people browse the store with a color filter, they feel more personal and connected to their taste.
Tag Filter
Tags come in handy when you want to highlight specific features like “new arrival,” “eco-friendly,” or “bestseller.” A tag filter helps people find items based on their purpose and choices. It’s a simple way to group similar products and guide people toward things they’re actually interested in.
Brand Filter
Many shoppers have favorite brands they trust and prefer to stick with. A brand filter lets them quickly browse only those names without going through everything else. It saves time and builds confidence, especially for returning customers who already know what they like.
Rating Filter
Most people buy products online, seeing users’ feedback and ratings. They do not have a concern about product price; they only want the best. A rating filter lets them sort by customer reviews and focus on top-rated products. This builds trust in your listings and helps convince people to buy by showing what others already love.
Why Dynamic Ajax Product Filter Plugin Ideal for Your WooCommerce Store?
If you want your customers to find products faster and shop without frustration, the Dynamic Ajax Product Filter plugin is exactly what your store needs. It’s fast, flexible, and built to give users instant results without page reloads. Here’s why it’s the smart choice for your WooCommerce site.
Easy to Customize and Control
You don’t need any coding skills to adjust how the filters look or work. From your WordPress dashboard, you can easily change the layout, choose filter styles (like checkboxes or dropdowns), and control where each filter appears. It gives you full control to match your store’s design and your customers’ needs.
Instant Update With Live Result
With the Dynamic Ajax product plugin, customers don’t have to wait for pages to reload every time they click a filter. As soon as they select an option, the products update right away. It keeps things smooth and fast, so your customers stay focused and don’t get frustrated while browsing through your store.
Range of Filtering Options
You can let your customers filter products by category, price, tags, color, size, rating, or whatever makes sense for your store. It gives people more control and helps them find what they’re looking for without digging through pages. And that means they’re more likely to stick around and make a purchase.
Integrates With Popular Themes and Builders
This plugin works well with the most popular WooCommerce themes and page builders like Elementor and Gutenberg. You don’t have to change your site’s design or structure; you just install it and set up your filters. It fits right in and does the job without causing layout or styling problems.
Fully Responsive to Mobile
Your targeted customers are probably using their phones just as much as desktops. That’s why this plugin is made to work perfectly on all screen sizes. The filters are easy to tap, scroll, and use on mobile, making shopping on the go just as smooth as it is on a computer.
Lightweight and Fast-loading
Despite offering powerful filtering features, the plugin is lightweight and won’t slow down your website. It’s built for performance, so your shop stays fast even with large product catalogs. That means smoother browsing for your customers, and no impact on your site speed or loading time.
Enhance SEO Performance
Based on filters, you’ll be able to create SEO friendly meta and URLs. Besides, increasing UX and letting people stay longer on your site is good for your SEO. Faster filtering, lower bounce rates, and more engagement send the right signals to search engines. Over time, that can help your store rank better and get more traffic naturally.
Professional Tips for Better Filtering UX
AJAX product filters improve speed and usability, but not every customer interacts with your site in the same way. If your filters are hard to read, click, or understand, you risk losing potential buyers, especially those using assistive tools or browsing on small screens. Here are a few things you can do to make your filters usable for everyone:
Use Clear and Simple Labels
Avoid generic terms like “Filter” or “Sort.” Instead, label your options with meaningful names like “Filter by Price,” “Select Size,” or “Choose Color.” This helps users instantly understand what they’re interacting with.
Show Active Filters Clearly
Once users apply filters to your store, let them see which filters are active. You can show selected tags or a filter summary at the top of the product grid. This helps people understand what’s currently being filtered without guessing.
Make Filters Keyboard-Friendly
Some users, like coders or developers, prefer to browse without a mouse. Ensure that all your filters can be reached using the tab key and activated with the keyboard. Try to avoid custom dropdowns that break keyboard navigation.
Limit Filter Options Where Possible
Too many choices sometimes confuse buyers. So, it is better not to overload the customer with that. If a filter has too many options, consider showing only the most relevant ones by default, with a “View More” option. Your purpose should be helping people rather than confusing them.
Avoid Overcrowding the Sidebar
Like filtering options, an overcrowded sidebar with unnecessary filters doesn’t help users. You need to group related filters and add spacing to give the layout room to breathe. If needed, use collapsible sections to help users focus on one category at a time.
Use Sufficient Color Contrast
To show selections, don’t rely only on color. Use clear visual cues like check marks or underlines. Also, make sure text and background colors have enough contrast to be read easily in bright or low-light settings.
Test on Mobile Devices
Just because filters look good on a desktop doesn’t mean they work well on phones. So, it would be wise to test tap targets, scrolling, and spacing on various screen sizes to make sure your mobile users can interact comfortably.
SEO Considerations With AJAX Filters
Speed and smooth navigation matter in a WooCommerce store, but that shouldn’t hurt your store’s SEO. AJAX filters already do most of the job related to your site’s UX; you just need to take a few extra steps to make sure filtered pages are still SEO-friendly. If not done right, your pages may look great to users but remain invisible to Google and other search engines. Here are some practical ways to avoid that:
SEO friendly Filter URLs
Whenever a user selects a filter on your store, make sure the URL updates cleanly without unnecessary strings. For example, /shop/filters/brand/color/size is better than a long, unreadable query. This also makes it easier for users to bookmark filtered results.
Control Indexing
You do not need to worry about indexing every filtered page. Let search engines’ bots crawl useful combinations like popular color or size filters, but block unnecessary combinations using “noindex” tags or your “robots.txt” file.
Add Canonical Tags
One of the common issues with filtered pages is that they often repeat content from the main category. To ensure it doesn’t repeat, you need to add a canonical tag to point back to the original page. This helps avoid duplicate content issues and keeps your SEO focused on your main product listings.
Submit a Sitemap
After adding filter-based pages that you want indexed, include them in your sitemap. This helps search engines find and crawl them faster. Most SEO experts use a custom sitemap tool to manage this professionally. If you do not want to hire a professional, use a reliable SEO plugin to do it yourself.
Keep Core Content Visible
Always try to keep the main product content visible in the initial HTML load, even if your filters rely on JavaScript. This ensures that search engines can still access and index your products properly. If everything loads only after a filter is clicked, bots may miss important data, which can impact your SEO ranking.
Watch Search Console
It’s always better to measure the filter’s performance. To do it without hassle, you can use Google Search Console. Monitor how newly set filters are doing and look for crawl errors, indexing issues, or duplicate pages. This will help you decide what should be shown to search engines and what shouldn’t.
Questions You Might Have on Your Minds
Setting up AJAX product filters is straightforward, but you might still have a few questions, especially when it comes to compatibility, layout control, or performance. Here are some common questions store owners ask when adding filters to their WooCommerce site:
Can I Set Up Filters Without Basic Coding Knowledge?
Yes, you can. Most AJAX filter plugins are made for beginners and work with simple drag-and-drop or block-based tools. You don’t need to write any code to add or customize the filters on your store.
What Filter Types Can I Add With Ajax?
Most Ajax product filter plugins support filtering by category, tags, price, attributes (like size or color), rating, availability, and even custom taxonomies. So, you can add as many filters as needed to match your product range and make it easier for customers.
Can Ajax Filters Work With Product Variations?
Yes, AJAX filters work with product variations like size or color. As long as you’ve set up the attributes properly, the filter will show the right options and help customers find the exact variation they want.
Do I Need a Premium Version for Advanced Features?
Though some filters offer some advanced options in their free version, you still miss the most advanced filters. For features like advanced styling, multiple forms, or integration with custom post types, you might need to upgrade your free version to premium.
What Happens If My Filters Don’t Appear After Setup?
This usually happens due to theme conflicts, missing widgets, or product loop issues. If you find your filters don’t appear after set up, check that your product archive is active, clear any caching plugins, and test again. Contact the developer team or support if it doesn’t resolve.
Last Words
Setting up filters shouldn’t feel like a technical hassle; it should feel like you’re making your store easier for real people to use. With the right plugin and a few simple steps, you can improve how customers browse your products without slowing down your site or hurting your SEO.
If you’ve been wondering how to set up AJAX product filters in WooCommerce, the answer is simpler than you might think. It’s about choosing a plugin that fits your store, placing the filters where they help most, and making sure they work just as smoothly on mobile as they do on desktop.
A fast, filter-friendly store isn’t just nice to have; it’s what today’s customers expect. So, take the time to set it up right. Your users will thank you with their clicks, and your store will thank you with more sales.
